Sunday, February 24, 2013

Pan Fried Zucchini with Lemon and Parmesan

I was reading something earlier today about the foods people most often cook wrong, and one of the main ones was vegetables. So many people just boil or steam the heck out of every vegetable they prepare, and end up with a discolored mush. No wonder there are so many kids that hate vegetables! Most vegetables don't need more than a few minutes of steaming, and there are so many other ways of preparing them. One of my favorites is pan frying, especially with zucchini.
I needed a side dish for macaroni and cheese tonight, so I made this. It's simple, but fresh and delicious, and it practically melts in your mouth. It's a snap to prepare, as well, and I was able to make it while my macaroni and cheese was in the oven.
First you cut up your zucchini into 1/4 inch rounds, and then sprinkle with salt and pepper.
Heat some olive oil in a large skillet, and then place the zucchini into the pan in a single layer.
Cook for five minutes on each side, or until nicely browned on each side. Remove from the pan.
Sprinkle with lemon juice and Parmesan cheese, and serve!
Yummy! Make sure to cook in one layer, because otherwise they won't brown properly. I cooked mine in two batches.
Here's the recipe:
Pan Fried Zucchini with Lemon and Parmesan
Ingredients:
4 small zucchini or 2 large zucchini (cut in 1/4 inch rounds)
Salt and pepper
3-4 T olive oil
Juice from 1/2 lemon
2 T Parmesan cheese (grated)

Instructions:
  1. Generously sprinkle both sides of the zucchini slices with salt and pepper. Set aside.
  2. Heat a large skillet over medium choice. When the skillet is hot, add half the olive oil.
  3. Place half of the zucchini in the pan, making sure the slices do not overlap. Cook for 5 minutes or until the bottoms of the slices are nicely browned. Flip the slices over and cook for until the other side is browned. Remove from skillet and repeat with remaining zucchini.
  4. Transfer the cooked zucchini slices to a plate. Sprinkle with lemon juice and Parmesan cheese.
  5. Eat.
Source: Lana's Cooking

Chocolate Chip Shortbread

The Rimers of Eldritch is over, as of yesterday night. However, it was a very successful run, and definitely a blast! Yesterday I made chocolate chip shortbread to sell at concessions. I love shortbread so much, because it generally only has a few ingredients (butter, sugar, and flour), but it is so light and crisp and sweet. The chocolate chips just make it a bit fancier. The shortbread melts in your mouth, and the best part is: you can eat the dough! There are no eggs in it (not that that's ever stopped me)!
Shortbread is the easiest cookie dough I've ever made. First you mix together the butter and sugar together in a stand mixer until very smooth. Then, beat in the vanilla.
Reduce mixer speed to low and add the flour, mixing only until the flour disappears into the dough.
Finally, fold in the chocolate chips with a spatula.
Gather dough and place between two sheets of plastic wrap. Roll the dough into a rectangle shape that's 1/4 inch thick. I started out by just pressing the dough with my hands into a roughly rectangular shape, and then rolling it to the desired thickness. Unfortunately mine isn't very rectangular, but that's okay.
Refrigerate for one hour, or until firm. Cut the dough into 1 1/2 inch squares, and place onto a baking sheet lined with parchment paper.
Bake for 18-20 minutes, or until they turn golden brown around the edges.
I might experiment with some fun shapes next time, but for now, these were good enough. They sold very well at the show last night.
Here's the recipe:
Chocolate Chip Shortbread Cookies
Makes about 3 dozen cookies
Ingredients:
2 sticks unsalted butter (at room temperature)
2/3 cup confectioners' sugar
1/2 t vanilla extract
2 cups all purpose flour
3/4 cup mini chocolate chips

Instructions:
  1. In a stand mixer, beat together the butter and sugar on medium speed until smooth, about 3 minutes. Beat in vanilla.
  2. Reduce mixer speed to low and add flour, mixing only until it disappears into the dough.
  3. Fold in the chocolate chips with a large spoon or spatula.
  4. Place dough between two sheets of plastic wrap. Roll the dough into a rectangular shape about 1/4 inch thick.
  5. Refrigerate the dough for at least one hour, or until firm.
  6. Cut dough into 1 1/2 inch squares. Bake for 18-20 minutes, or until golden brown around the edges.
  7. Eat.
Source: Kirbie Cravings

Saturday, February 23, 2013

Chocolate Whoopie Pies with Buttercream Filling

Hey guys! It's the last night to see The Rimers of Eldritch! We've already had two very successful days. Last night I signed up to bring a dessert to sell at concessions, and I decided to bring whoopie pies. If you don't know what I whoopie pie is, it's like a giant cake oreo, except even better and more delicious. They're typically an east coast thing. My friend Alyssa bought me a whoopie pie pan and recipe book a few years ago, and they are so much fun!
First you sift together flour, cocoa powder, baking soda, and salt.
Next, with a stand mixer and a paddle attachment, beat together butter, shortening, and brown sugar until just combined.
Add an egg and vanilla.
Now, add half of the flour mixture and half of the milk.
  When that is mixed in, add the remaining flour and milk.
Make sure you scrape down the sides between every step! Next, drop 1 T (for 2 inch cakes) or 2 T (for 4 inch cakes) of batter onto a baking sheet with either parchment paper or a silicon baking mat. I made 4 inch cakes for selling.
Bake for 10 minutes, or until pies spring back when pressed gently.
Here I got a little rushed for time and forgot to take pictures of the filling process. However, it's really easy to make. Just beat together butter and powdered sugar until crumbly, then add heavy cream, vanilla, and salt, and beat on high until smooth. How long you beat it after it is all combined is up to you. If you beat the filling for less time, it is thicker, but if you beat it for a while, it is fluffy, and you can fill two batches of whoopie pies with one batch of filling. That is what I did. Pipe the filling onto the flat side of one cake, and then top it with another cake, flat side down.
That's it! They are best the first day of making them, but if you wrap them with plastic wrap, they stay good for longer. They also freeze really well, and if you eat them while they are frozen, they taste like ice cream bars :).
Here's the recipe:
Classic Chocolate Whoopie
Makes about 48 two-inch cakes
Ingredients:
1 2/3 cups all-purpose flour
2/3 cup unsweetened cocoa powder
1 1/2 t baking soda
1/2 t salt
4 T unsalted butter (at room temperature)
4 T vegetable shortening
1 cup brown sugar (packed)
1 egg
1 t vanilla extract
1 cup milk

Instructions:
  1. Sift together the flour, cocoa powder, baking soda, and salt in a large bowl. Set aside.
  2. In a stand mixer with a paddle attachment, beat together the butter, shortening, and brown sugar on low speed until just combined. Increase the speed to medium and beat until fluffy and smooth, about 3 minutes.
  3. Add the egg and vanilla and beat for another 2 minutes.
  4. Add half of the flour mixture and half of the milk to the batter and beat on low until just incorporated. Add the remaining flour mixture and 1/2 cup milk and beat until completely combined.
  5. Drop about 1 T (for 2 inch cakes) or 2 T (for 4 inch cakes) of batter onto a baking sheet lined with either parchment paper or a silicon baking mat, spacing them at least 2 inches apart. Bake one sheet at a time for about 10 minutes, or until pies spring back when pressed gently.
  6. Remove from oven and let the cakes cool on the sheet for about 5 minutes before transferring them to a rack to cool completely.
  7. Fill the whoopie pies by piping filling onto the flat side of a cake. Top it with another cake, flat side down. Repeat with the rest of the cakes and filling.
  8. Eat.
Source: Whoopie Pies
Classic Buttercream Filling
Ingredients:
3 cups confectioners' sugar
1 stick unsalted butter (at room temperature)
3-4 T heavy whipping cream
1 t vanilla extract
Pinch of salt

Instructions:
  1. In a stand mixer with a paddle attachment, beat together the confectioners' sugar with the butter, starting on low and increasing to medium speed, until the mixture is crumbly, about 1 minute.
  2. Add the heavy cream, vanilla, and salt and beat on high speed until smooth, about 3 minutes.
Source: Whoopie Pies

Wednesday, February 20, 2013

Apple Pie

As I mentioned in my previous post, this week my drama club is putting on The Rimers of Eldritch! A few of the scenes take place in a diner, and one of the characters mentions pies, so I volunteered to make pies for the diner. This isn't my first time making prop food; in the fall we put on The Man Who Came to Dinner, and I had to make several small cakes and souffles for that. The actors seem to enjoy having real food onstage, and they're great treats to bring to the cast parties.
Anyway, my favorite pie is apple, and since it will be sitting under hot stage lights, I didn't want to make any kind of pie that would melt or suffer in the heat. Apple pie is one of the easier pies to make (from scratch, that is) and is well liked by everyone. Brandon and I made apple pie in a jar over Thanksgiving break, and we found the most time consuming part was peeling, chopping, and coring the apples. This time, however, I dug out my mom's apple corer, peeler, and slicer from the Pampered Chef. I prepped all of my apples in a quarter of the time it took two of us without. If you don't have one of these, prepare to spend a lot of time prepping. You could also make the filling in advance and freeze it.
I like to make the pie crust from scratch, but if you don't want to, then you can buy a refrigerated pie crust from your local supermarket. If you are going to make the crust, start it before you make the filling, because it needs time to chill.
First combine flour, sugar, and salt in a food processor and pulse a few times to combine.
Next, cut up a cube of butter and add it to the flour mixture.
Pulse until the mixture resembles coarse meal, like this:
Next add some ice water and pulse until the dough is beginning to combine, and when pinched between your fingers, it sticks together.
Dump the mixture out onto a flat surface, and work it together with your hands until it comes together. Shape the dough into a round disk, about 3/4 inches thick.
Wrap it up in plastic wrap and refrigerate for an hour. Depending on the type of top you want to make, either make another pie crust (for a double crust or lattice top) or make a dutch crumb topping (I don't have a recipe for this, so find one!). I chose to make a double crust.
Next, wash your apples.
Peel, core, and chop them. This is what they look like after coming off the Pampered Chef machine:
I cut these into quarters. Put the chopped apples into a large bowl, and sprinkle with lemon juice to prevent browning.
In a small bowl, mix together the brown sugar, flour, and spices.
 Make sure to get rid of all brown sugar lumps.
Pour this mixture over the apples and toss the apples until they are all coated.
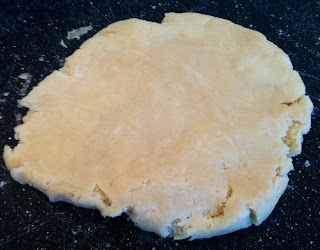
 When the dough is chilled, take it out and put it onto a floured surface. Roll it out until it is 1 inch wider on all sides than your pie dish, like so.

Transfer the crust to your pie dish, and trim any extra crust from the edges with a knife.
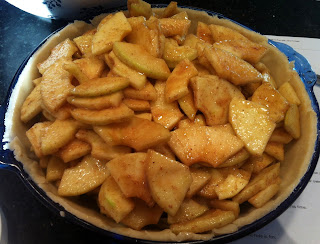
Spoon (do not pour!) the filling into your prepared pie crust until very full.
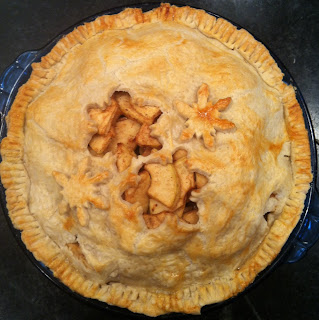
Now, put the pie topping on. I used a double crust, so I rolled out the other crust to the same size as the first. I cut out some snowflakes to go with the theme of the play, but if you don't do any cutouts, cut a few vents into the top crust. This allows the steam to escape. Put the top crust onto the pie and pinch together with the bottom crust. I used a fork to make sure it was sealed. Finally, I brushed it with beaten egg white to make it shiny. If you put the cutout pie crust on top, like I did with the snowflakes, glue them down with the egg white.
Bake for 30-40 minutes, or until the crust is golden brown and the apples are soft.
I'm really pleased with how the pie turned out! It's the first full-size pie that I've made by myself, although I've had a lot of experience helping my Grama make her amazing berry pies. Unfortunately I do not get to eat it until closing night, but I've used these same recipes for the pie-in-a-jar, so I know they're good.
Here's the recipe:
Butter Pie Crust
Ingredients:
1 1/4 cups all purpose flour (plus more for rolling dough)
1/2 t salt
1/2 t sugar
1 stick cold unsalted butter (cut into pieces)
2 T ice water

Instructions:
  1. In a food processor, pulse flour, salt, and sugar together until combined. Add butter and pulse until mixture resembles coarse meal.
  2. Sprinkle with the ice water, and pulse until dough is crumbly but holds together when squeezed with fingers. Do not overprocess.
  3. Turn dough out onto a work surface. Form dough into a 3/4" thick disk. Wrap tightly in plastic, and refrigerate until firm, at least 1 hour.
  4. Before baking, unwrap dough and place onto a floured surface. Roll the dough out to a circle that is roughly one inch wider than the pie pan on all sides.
  5. Transfer dough to the pie pan, trim excess dough from the sides, and crimp edges.
  6. Fill and bake according to recipe.
Source: Martha Stewart
Apple Pie
Ingredients:
2 prepared pie crusts
6 Granny Smith apples
2 Red Delicious apples
1-2 T lemon juice
1 cup brown sugar
1/4 cup flour
1 t cinnamon
1/2 t nutmeg
1 egg white (beaten)

Instructions:
  1. Peel, core, and chop all apples. Put chopped apples into a large bowl, and sprinkle with lemon juice.
  2. Combine brown sugar, flour, and spices in another bowl and mix. Then, pour over apples and mix it all together.
  3. Spoon filling into prepared pie crust until very full. 
  4. Cut a few slits into second pie crust, and then transfer to the top of the pie. Pinch together with the bottom crust, and seal with the tines of a fork. Brush the crust with the beaten egg white.
  5. Bake at 400 degrees for 30-40 minutes, or until crust is golden brown and the apples are soft.
  6. Eat.
Source: Cravings of a Lunatic

Tuesday, February 19, 2013

Slutty Brownies

It's production week! My high school drama club is putting on The Rimers of Eldritch this week! Tomorrow is our last dress rehearsal, and we always have people bring in food. I volunteered to bring dessert, and oh, what a dessert it is!
These brownies are more than just brownies. First, a layer of cookie dough, then a layer of oreos (double stuffed, if you please), and finally, a brownie layer. Perfect for giving drama kids energy. They are slutty because, according to The Londoner, "they are oh so easy, and more than a little bit filthy".
And they are easy! I used boxed mixes (don't tell!), but if you're a purist, you could make them from scratch. I'm a fan of Betty Crocker mixes. Because I had to make these for roughly 30 kids, I doubled the recipe. Here are all the ingredients:
First, take a pan (I used 13x9), and line it with parchment paper. Next, take your chocolate chip cookie mix, and make it according to package instructions. Mine called for a stick of butter, and an egg. I mixed the butter in first.
One thing I do not like about this mix is that the chocolate chips are already in it, and not packaged separately. Unless you mix it by hand, the chocolate chips get broken up in the process. My dough ended up with little bits of chocolate chips (but I don't think anyone will care).
Now I mixed in the egg. Because the cookie dough will be baking for a lot longer than it is normally baked for, I added an extra teaspoon of oil, to keep it moist.
Now spread the cookie dough in the pan until it covers the bottom.
Yummmmm. Now, the layer of oreos.
Now make your brownie mix according to the package's directions.
And pour it over the top of the oreos. Spread it around to make sure it covers everything.
Bake for roughly 45 minutes (original recipe says 30, but they were wayyy too gooey after 30). 
Take it out and let it cool, then lift it out with the paper and cut it into squares. If you want the squares to look pretty and uniform, let the brownies cool overnight and cut them the next day. They'll be much more manageable. 
If you're making these, you've obviously taken a break from any diet, so eat it with ice cream. Why not? Go big or go home! They are the best brownies I have ever had.
Here's the recipe:
Slutty Brownies
Ingredients:
1 box of chocolate chip cookie mix (and additional required ingredients)
1 t vegetable oil
1 box of brownie mix (and additional required ingredients)
1 pack of oreos

Instructions:
  1. Line a 13x9 inch pan with parchment paper.
  2. Make chocolate chip cookie mix according to package instructions. Add the oil and mix well.
  3. Spread the cookie dough into the bottom of the pan until it covers the bottom.
  4. Add a single layer of oreos on top of the cookie dough.
  5. Make brownie mix according to package instructions.
  6. Spread the brownie batter over the oreos until it covers them.
  7. Bake at 350 degrees for 45 minutes.
  8. Let cool for a few minutes, and then lift out with the paper and cut into squares.
  9. Eat.
Source: The Londoner

Monday, February 18, 2013

Brussels Sprouts with Parmesan

I can understand why some people don't like Brussels sprouts. They have a really strong flavor, which almost has a bit of a horseradish flair. Plus, they're so weird looking! They're like teeny cabbages.
I, on the other hand, love Brussels sprouts. Tonight we had fish again, so I made some Brussels sprouts to go with it. Usually I just roast them for a while in the oven, but when I have a little more time to prep, I make these. They're still really easy to make, and extremely yummy. My family likes to make them to bring to holiday dinner parties.
The original recipe called for toasted pine nuts to go on top, but I had none, so I left them out. The recipe is great with or without them.
First prep your Brussels sprouts by taking off the outer leaves and chopping off the stem. Then, quarter them.
Next, heat up some olive oil in a large frying pan over high heat. Add some garlic and the sprouts and cook until brown and softened.
Next add some vegetable broth and cook until the sprouts are tender.
Remove from the pan and top with some grated Parmesan cheese. Let it melt, and then serve!
I think cooking the Brussels sprouts on the stove takes less time than it does in the oven. They're nice and soft thanks to the veggie broth, instead of being more dried out like they are when they are roasted. However, I like them both ways :).
Here's the recipe:
Brussels Sprouts with Parmesan
Ingredients:
1 T olive oil
2 garlic cloves (minced)
3/4 lb. Brussels sprouts (stemmed and quartered)
1/4 cup vegetable broth
3 T Parmesan cheese (grated)

Instructions:
  1. Heat olive oil in a large frying pan over high heat. Add the garlic and Brussels sprouts and cook until brown and softened, about 8 minutes.
  2. Add broth and cook until sprouts are tender but not soggy, 3-4 minutes.
  3. Transfer to a serving dish and top with the Parmesan.
  4. Eat.
Source: Sunset